Privacy Protection系列

1.写在前面
你有没有这样一种需求?
一天,你想要分享一个文档给你的朋友。你不希望这个文档被其他人看到,或者看了一次之后就马上销毁。
有什么可选择的方法呢?
PrivateBin?这个可以,但是它不支持带点图片的文本。虽说markdown支持base64形式的图片,但如果图片很多呢?
nextcloud?这个也行,但是我之前连接onlyoffice时总是会断连,体验不怎么好。
又或者,你想对外分享一个文档,但是只能看,不允许下载或者编辑什么的,并且再来个定时销毁。
那么,Cryptpad无疑是一个好的选择。
但是,目前为止(2025/3/25),网上关于如何搭建cryptpad的中文教程寥寥无几,且官方教程没有中文版本。
所以我这里基于官方文档简单的讲一下搭建过程,非docker搭建。
2.准备工作
根据官方的文档,你需要至少这个配置的服务器:
- Debian 12
- 2GB RAM
- 2 CPUs
- 20GB storage (depending on planned usage)
另外,最好准备两个域名,两个子域名也可以,比如:
aaa.test.com
bbb.test.com
这两个都是可以的。
还有准备git和node.js这两个东西。
对于node.js,先执行这个命令。
curl -o- https://raw.githubusercontent.com/nvm-sh/nvm/v0.39.3/install.sh | bash这会安装nvm。
然后。
nvm list-remote如果bash告诉你没有nvm这个命令,就输入bash然后回车刷新一下环境变量。
你应该会看到如下输出:
...
        v22.0.0
        v22.1.0
        v22.2.0
        v22.3.0
        v22.4.0
        v22.4.1
        v22.5.0
        v22.5.1
        v22.6.0
        v22.7.0
        v22.8.0
        v22.9.0
       v22.10.0
       v22.11.0   (LTS: Jod)
       v22.12.0   (LTS: Jod)
       v22.13.0   (LTS: Jod)
       v22.13.1   (LTS: Jod)
       v22.14.0   (Latest LTS: Jod)
        v23.0.0
        v23.1.0
        v23.2.0
        v23.3.0
        v23.4.0
        v23.5.0
        v23.6.0
        v23.6.1
        v23.7.0
        v23.8.0
        v23.9.0
       v23.10.0
这是让你选择一个版本,编写本文时,最新的LTS是22.14.0(代号Jod),所以我们安装这个。
nvm install lts/Jod如果安装成功,那么:
root@debian:/etc/bind# node -v
v22.14.0
安装bower:
npm install -g bower按照官方教程,克隆cryptpad的github库。
git clone https://github.com/cryptpad/cryptpad.git cryptpad然后设置一下权限
chmod 755 ./cryptpad -R
chown www-data:www-data ./cryptpad -R
然后cd进入文件夹,开始配置。
3.配置
搞一下依赖:
npm ci
npm run install:components
用官方的安装脚本安装onlyoffice:
./install-onlyoffice.sh然后会显示一个用户协议,按Q退出,然后Y回车。
好了之后,开始改配置文件,先复制一份模板。
cp config/config.example.js config/config.js主要就改两个地方,httpUnsafeOrigin和httpSafeOrigin。
httpUnsafeOrigin改成你的主域名,httpsafeOrigin改成沙盒域名,httpSafeOrigin前面有注释,要取消。
事实上,虽然不配置httpSafeOrigin也可以用,但是上次我在docker运行时如果不配置httpSafeOrigin,那么有些UI的功能会用不了,比如点击按钮没反应。
配置完成后,可以在cryptpad的目录下用node server命令启动服务。它会返回一个安装配置URL,但是我不推荐这么启动,所以我们把它给systemd。
nano ~/cryptpad/docs/cryptpad.service下面是我改好的配置文件:
# SPDX-FileCopyrightText: 2023 XWiki CryptPad Team <[email protected]> and contributors
#
# SPDX-License-Identifier: AGPL-3.0-or-later

[Unit]
Description=CryptPad API server

[Service]
ExecStart=/root/.nvm/versions/node/v22.14.0/bin/node /root/cryptpad/server.js
# modify to match the location of your cryptpad repository
WorkingDirectory=/root/cryptpad

Restart=always
# Restart service after 10 seconds if node service crashes
RestartSec=2

# Proper logging to journald
StandardOutput=journal
StandardError=journal+console

User=root
Group=root
# modify to match your working directory
Environment='PWD="/root/cryptpad"'

# systemd sets the open file limit to 4000 unless you override it
# cryptpad stores its data with the filesystem, so you should increase this to match the value of `ulimit -n`
# or risk EMFILE errors.
LimitNOFILE=1000000

# hardening directives as per https://www.freedesktop.org/software/systemd/man/systemd.exec.html
# check those with systemd-analyze security cryptpad.service for more information
# Proc filesystem
ProcSubset=all
ProtectProc=invisible
# Capabilities
CapabilityBoundingSet=
# Security
NoNewPrivileges=true
# Sandboxing
ProtectSystem=strict
PrivateTmp=true
PrivateDevices=true
ProtectHostname=true
ProtectKernelLogs=true
ProtectKernelModules=true
ProtectKernelTunables=true
ProtectControlGroups=true
RestrictAddressFamilies=AF_INET
RestrictAddressFamilies=AF_INET6
RestrictAddressFamilies=AF_NETLINK
RestrictAddressFamilies=AF_UNIX
RestrictNamespaces=true
LockPersonality=true
RestrictRealtime=true
RestrictSUIDSGID=true
RemoveIPC=true
PrivateMounts=true
ProtectClock=true
# System Call Filtering
SystemCallArchitectures=native
SystemCallFilter=~@cpu-emulation @debug @keyring @ipc @mount @obsolete @privileged @setuid
SystemCallFilter=@chown
SystemCallFilter=pipe
SystemCallFilter=pipe2
ReadWritePaths=/root/cryptpad

[Install]
WantedBy=multi-user.target
对于模板的配置文件,你需要配置node可执行文件的路径。事实上,它在用户家目录里,就比如root,它在/root/.nvm/versions/node/v22.14.0/bin/node
然后就是你把cryptpad克隆到的目录,如果你也是用root,并且git clone在家目录,那么我的这个配置文件你可以直接复制粘贴用了。
改好之后,cp过去给systemd
cp ~/cryptpad/docs/cryptpad.service /etc/systemd/system/cryptpad.service
sudo systemctl daemon-reload
然后启动并查看状态。
systemctl enable cryptpad --now
systemctl status cryptpad
root@debian:~/cryptpad# systemctl enable cryptpad --now
Created symlink /etc/systemd/system/multi-user.target.wants/cryptpad.service -> /etc/systemd/system/cryptpad.service.
root@debian:~/cryptpad# systemctl status cryptpad
* cryptpad.service - CryptPad API server
Loaded: loaded (/etc/systemd/system/cryptpad.service; enabled; preset: enabled)
Active: active (running) since Tue 2025-03-25 16:50:13 CST; 5s ago
Main PID: 17473 (node)
Tasks: 187 (limit: 9412)
Memory: 324.5M
CPU: 2.920s
CGroup: /system.slice/cryptpad.service
|-17473 /root/.nvm/versions/node/v22.14.0/bin/node /root/cryptpad/server.js
|-17484 /root/.nvm/versions/node/v22.14.0/bin/node ./lib/http-worker.js
|-17485 /root/.nvm/versions/node/v22.14.0/bin/node ./lib/http-worker.js
|-17486 /root/.nvm/versions/node/v22.14.0/bin/node ./lib/http-worker.js
|-17487 /root/.nvm/versions/node/v22.14.0/bin/node ./lib/http-worker.js
|-17488 /root/.nvm/versions/node/v22.14.0/bin/node ./lib/http-worker.js
|-17489 /root/.nvm/versions/node/v22.14.0/bin/node ./lib/http-worker.js
|-17495 /root/.nvm/versions/node/v22.14.0/bin/node ./lib/http-worker.js
|-17497 /root/.nvm/versions/node/v22.14.0/bin/node ./lib/http-worker.js
|-17540 /root/.nvm/versions/node/v22.14.0/bin/node lib/workers/db-worker
|-17541 /root/.nvm/versions/node/v22.14.0/bin/node lib/workers/db-worker
|-17547 /root/.nvm/versions/node/v22.14.0/bin/node lib/workers/db-worker
|-17548 /root/.nvm/versions/node/v22.14.0/bin/node lib/workers/db-worker
|-17555 /root/.nvm/versions/node/v22.14.0/bin/node lib/workers/db-worker
|-17562 /root/.nvm/versions/node/v22.14.0/bin/node lib/workers/db-worker
|-17567 /root/.nvm/versions/node/v22.14.0/bin/node lib/workers/db-worker
`-17571 /root/.nvm/versions/node/v22.14.0/bin/node lib/workers/db-worker
Mar 25 16:50:13 debian systemd[1]: Started cryptpad.service - CryptPad API server.
Mar 25 16:50:13 debian node[17473]: =============================
Mar 25 16:50:13 debian node[17473]: Create your first admin account and customize your instance by visiting
Mar 25 16:50:13 debian node[17473]: https://www.test.com/install/#36d0e4dca1fb70152e350774332e9ded27a5ca5a58370ba9f70254a184f28e23
Mar 25 16:50:13 debian node[17473]: =============================成功了就会像这样,给出安装配置的URL。
但是现在还不能访问。接下来,我们要继续配置nginx。
接下来的配置涉及到证书,如果你需要自签名证书什么的,可以去看看第4节的内容。
首先,官方贴心的给我们提供了一个nginx配置模板。
# SPDX-FileCopyrightText: 2023 XWiki CryptPad Team <[email protected]> and contributors
#
# SPDX-License-Identifier: AGPL-3.0-or-later

#   This file is included strictly as an example of how Nginx can be configured
#   to work with CryptPad. This example WILL NOT WORK AS IS. For best results,
#   compare the sections of this configuration file against a working CryptPad
#   installation (http server by the Nodejs process). If you are using CryptPad
#   in production and require professional support please contact [email protected]

server {
    listen 80;
    listen [::]:80;
    server_name your-main-domain.com your-sandbox-domain.com;

    access_log /dev/null;
    error_log /dev/null emerg;

    # Let's Encrypt webroot
    include letsencrypt-webroot;

    # Redirect all HTTP requests to HTTPS with a 301 Moved Permanently response.
    return 301 https://$host$request_uri;
}

server {
    listen 443 ssl;
    listen [::]:443 ssl;
    http2 on;

    # Let's Encrypt webroot
    include letsencrypt-webroot;

    # CryptPad serves static assets over these two domains.
    # `your-main-domain` is what users will enter in their address bar.
    # Privileged computation such as key management is handled in this scope
    # UI content is loaded via the `your-sandbox-domain`.
    # "Content Security Policy" headers prevent content loaded via the sandbox
    # from accessing privileged information.
    # This setup allows to take advantage of CryptPad's sandboxing techniques.
    # In the event of an XSS vulnerability in CryptPad's front-end code
    # this will limit the amount of information accessible to attackers.
    server_name your-main-domain.com your-sandbox-domain.com;

    # You'll need to Set the path to your certificates and keys here
    # IMPORTANT: this config is intended to serve assets for at least two domains
    # (your main domain and your sandbox domain). As such, you'll need to generate a single SSL certificate
    # that includes both domains in order for things to work as expected.
    ssl_certificate /etc/ssl/lets-encrypt/your-main-domain.com/cert;
    ssl_certificate_key /etc/ssl/lets-encrypt/your-main-domain.com/key;

    # diffie-hellman parameters are used to negotiate keys for your session
    # generate strong parameters using the following command
    ssl_dhparam /etc/nginx/dhparam.pem; # openssl dhparam -out /etc/nginx/dhparam.pem 4096

    # Speeds things up a little bit when resuming a session
    ssl_session_timeout 1d;
    ssl_session_cache shared:MozSSL:10m;
    ssl_session_tickets off;

    ssl_protocols TLSv1.2 TLSv1.3;
    ssl_ciphers ECDHE-ECDSA-AES128-GCM-SHA256:ECDHE-RSA-AES128-GCM-SHA256:ECDHE-ECDSA-AES256-GCM-SHA384:ECDHE-RSA-AES256-GCM-SHA384:ECDHE-ECDSA-CHACHA20-POLY1305:ECDHE-RSA-CHACHA20-POLY1305:DHE-RSA-AES128-GCM-SHA256:DHE-RSA-AES256-GCM-SHA384;
    ssl_prefer_server_ciphers off;

    # HSTS (ngx_http_headers_module is required) (63072000 seconds)
    add_header Strict-Transport-Security "max-age=63072000; includeSubDomains" always;

    # OCSP stapling
    ssl_stapling on;
    ssl_stapling_verify on;

    # verify chain of trust of OCSP response using Root CA and Intermediate certs
    ssl_trusted_certificate /etc/ssl/certs/ca-certificates.crt;

    # replace with the IP address of your resolver
    resolver 8.8.8.8 8.8.4.4 1.1.1.1 1.0.0.1 9.9.9.9 149.112.112.112 208.67.222.222 208.67.220.220;

    location / {
        proxy_pass            http://localhost:3000;
        proxy_set_header      X-Real-IP $remote_addr;
        proxy_set_header      Host $host;
        proxy_set_header      X-Forwarded-For $proxy_add_x_forwarded_for;
        client_max_body_size  150m;

        proxy_http_version    1.1;
        proxy_set_header      Upgrade $http_upgrade;
        proxy_set_header      Connection upgrade;
    }

    location ^~ /cryptpad_websocket {
        proxy_pass            http://localhost:3003;
        proxy_set_header      X-Real-IP $remote_addr;
        proxy_set_header      Host $host;
        proxy_set_header      X-Forwarded-For $proxy_add_x_forwarded_for;

        proxy_http_version    1.1;
        proxy_set_header      Upgrade $http_upgrade;
        proxy_set_header      Connection upgrade;
    }
}
我们把它放到/etc/nginx/sites-enabled里面。
改的地方不是很多,你可以看一下我改的地方:
# SPDX-FileCopyrightText: 2023 XWiki CryptPad Team <[email protected]> and contributors
#
# SPDX-License-Identifier: AGPL-3.0-or-later

#   This file is included strictly as an example of how Nginx can be configured
#   to work with CryptPad. This example WILL NOT WORK AS IS. For best results,
#   compare the sections of this configuration file against a working CryptPad
#   installation (http server by the Nodejs process). If you are using CryptPad
#   in production and require professional support please contact [email protected]

server {
    listen 80;
    listen [::]:80;
    server_name www.test.com sandbox.test.com;

    access_log /dev/null;
    error_log /dev/null emerg;

    # Let's Encrypt webroot
    #include letsencrypt-webroot;

    # Redirect all HTTP requests to HTTPS with a 301 Moved Permanently response.
    return 301 https://$host$request_uri;
}

server {
    listen 443 ssl http2;
    listen [::]:443 ssl http2;
    #http2 on;

    # Let's Encrypt webroot
    #include letsencrypt-webroot;

    # CryptPad serves static assets over these two domains.
    # `your-main-domain` is what users will enter in their address bar.
    # Privileged computation such as key management is handled in this scope
    # UI content is loaded via the `your-sandbox-domain`.
    # "Content Security Policy" headers prevent content loaded via the sandbox
    # from accessing privileged information.
    # This setup allows to take advantage of CryptPad's sandboxing techniques.
    # In the event of an XSS vulnerability in CryptPad's front-end code
    # this will limit the amount of information accessible to attackers.
    server_name www.test.com sandbox.test.com;

    # You'll need to Set the path to your certificates and keys here
    # IMPORTANT: this config is intended to serve assets for at least two domains
    # (your main domain and your sandbox domain). As such, you'll need to generate a single SSL certificate
    # that includes both domains in order for things to work as expected.
    ssl_certificate /CA/test/test_crypt.crt;
    ssl_certificate_key /CA/test/test_crypt.key;

    # diffie-hellman parameters are used to negotiate keys for your session
    # generate strong parameters using the following command
    ssl_dhparam /etc/nginx/dhparam.pem; # openssl dhparam -out /etc/nginx/dhparam.pem 4096

    # Speeds things up a little bit when resuming a session
    ssl_session_timeout 1d;
    ssl_session_cache shared:MozSSL:10m;
    ssl_session_tickets off;

    ssl_protocols TLSv1.2 TLSv1.3;
    ssl_ciphers ECDHE-ECDSA-AES128-GCM-SHA256:ECDHE-RSA-AES128-GCM-SHA256:ECDHE-ECDSA-AES256-GCM-SHA384:ECDHE-RSA-AES256-GCM-SHA384:ECDHE-ECDSA-CHACHA20-POLY1305:ECDHE-RSA-CHACHA20-POLY1305:DHE-RSA-AES128-GCM-SHA256:DHE-RSA-AES256-GCM-SHA384;
    ssl_prefer_server_ciphers off;

    # HSTS (ngx_http_headers_module is required) (63072000 seconds)
    add_header Strict-Transport-Security "max-age=63072000; includeSubDomains" always;

    # OCSP stapling
    ssl_stapling on;
    ssl_stapling_verify on;

    # verify chain of trust of OCSP response using Root CA and Intermediate certs
    ssl_trusted_certificate /CA/test/test.crt;

    # replace with the IP address of your resolver
    resolver 8.8.8.8 8.8.4.4 1.1.1.1 1.0.0.1 9.9.9.9 149.112.112.112 208.67.222.222 208.67.220.220;

    location / {
        proxy_pass            http://localhost:3000;
        proxy_set_header      X-Real-IP $remote_addr;
        proxy_set_header      Host $host;
        proxy_set_header      X-Forwarded-For $proxy_add_x_forwarded_for;
        client_max_body_size  150m;

        proxy_http_version    1.1;
        proxy_set_header      Upgrade $http_upgrade;
        proxy_set_header      Connection upgrade;
    }

    location ^~ /cryptpad_websocket {
        proxy_pass            http://localhost:3003;
        proxy_set_header      X-Real-IP $remote_addr;
        proxy_set_header      Host $host;
        proxy_set_header      X-Forwarded-For $proxy_add_x_forwarded_for;

        proxy_http_version    1.1;
        proxy_set_header      Upgrade $http_upgrade;
        proxy_set_header      Connection upgrade;
    }
}
这里我特别说一下,include letsencrypt-webroot;这个要注释掉。因为我们没有用Let’s Encrypt的证书小工具,假设你已经把证书和私钥放到了别的地方,下面改掉就是。
还有ssl那里的http2 on;同样注释,应该把http2加入到listen 443后面。
还有,cryptpad要求我们生成一个Diffie-Hellman密钥,执行这个命令即可:
openssl dhparam -out /etc/nginx/dhparam.pem 4096注意,执行后,openssl会开始进行计算,你看到…+…..什么的就是计算过程。在一些性能一般的服务器可能需要几十分钟,你也可以用你的电脑计算生成后上传到服务器。
root@debian:/etc/nginx/sites-enabled# openssl dhparam -out /etc/nginx/dhparam.pem 4096
Generating DH parameters, 4096 bit long safe prime
.........+....................................................................................................................................................................................................................................................................................................................................................................................................+.................+.....................+.....................................................................+.........................................................................+..............................................................................................................................................................................................................................................................................+...........................................++*++*++*++*++*++*++*++*++*++*++*++*++*++*++*++*++*++*++*++*++*++*++*++*++*++*++*++*++*++*++*++*++*++*++*++*++*++*++*++*++*++*++*++*++*++*++*++*++*++*++*++*++*++*++*++*++*++*++*++*++*++*++*++*++*++*++*++*++*++*++*++*++*++*++*++*++*++*++*++*++*++*++*++*++*++*++*++*++*++*++*++*++*++*++*++*++*++*++*++*++*++*++*++*++*++*++*++*++*++*++*++*++*++*++*++*++*++*++*++*++*++*++*++*++*++*++*++*
好在我的电脑还是给我面子的,一下就好了。。。
然后,启动nginx服务,如果没有问题,nginx将会反向代理cryptpad。
4.自签名证书配置(可选)
如果你已经准备好证书,那么可以跳过这里。
如果你是内网使用或者因为一些别的原因,只能自签名证书,那么这里我给出从自签名CA到自签名证书的过程。
首先,输出一个私钥:
openssl genrsa -out test.key 4096用私钥签名CA证书:
openssl req -x509 -new -nodes -key test.key -out test.crt -days 3650 -sha256
输出网站私钥:
openssl genrsa -out test_crypt.key 4096
新建证书请求:
openssl req -new -key test_crypt.key -out test_crypt.csr
编辑一份ext.ini,内容为:
[v3_req]
subjectAltName = @alt_names

[alt_names]
DNS.1 = test.com
DNS.2 = www.test.com
DNS.3 = *.test.com
DNS那些改成你自己要用的域名。
配置CA命令:
修改openssl配置文件
vim /etc/ssl/openssl.cnf你应该可以看到这一段:
[ CA_default ]

dir             = ./demoCA              # Where everything is kept
certs           = $dir/certs            # Where the issued certs are kept
crl_dir         = $dir/crl              # Where the issued crl are kept
database        = $dir/index.txt        # database index file.
#unique_subject = no                    # Set to 'no' to allow creation of
                                        # several certs with same subject.
new_certs_dir   = $dir/newcerts         # default place for new certs.

certificate     = $dir/cacert.pem       # The CA certificate
serial          = $dir/serial           # The current serial number
crlnumber       = $dir/crlnumber        # the current crl number
                                        # must be commented out to leave a V1 CRL
crl             = $dir/crl.pem          # The current CRL
private_key     = $dir/private/cakey.pem# The private key

x509_extensions = usr_cert              # The extensions to add to the cert
你可以按照它的说明创建文件夹,把CA的证书和私钥按照它的要求放进去,也可以自己修改位置。
比如我的:
[ CA_default ]

dir             = /CA/test              # Where everything is kept
certs           = $dir/certs            # Where the issued certs are kept
crl_dir         = $dir/crl              # Where the issued crl are kept
database        = $dir/index.txt        # database index file.
#unique_subject = no                    # Set to 'no' to allow creation of
                                        # several certs with same subject.
new_certs_dir   = $dir/newcerts         # default place for new certs.

certificate     = $dir/test.crt         # The CA certificate
serial          = $dir/serial           # The current serial number
crlnumber       = $dir/crlnumber        # the current crl number
                                        # must be commented out to leave a V1 CRL
crl             = $dir/crl.pem          # The current CRL
private_key     = $dir/test.key # The private key

x509_extensions = usr_cert              # The extensions to add to the cert
按照配置文件创建文件和文件夹:
mkdir /CA/test/newcerts
echo 01 > /CA/test/serial
touch /CA/test/index.txt
CA签发证书:
root@debian:/CA/test# openssl ca -in test_crypt.csr -out test_crypt.crt -days 3650 -batch -extfile ext.ini -extensions v3_req
Using configuration from /usr/lib/ssl/openssl.cnf
Check that the request matches the signature
Signature ok
Certificate Details:
        Serial Number: 1 (0x1)
        Validity
            Not Before: Mar 25 09:14:21 2025 GMT
            Not After : Mar 23 09:14:21 2035 GMT
        Subject:
            countryName               = CN
            stateOrProvinceName       = test
            organizationName          = test
            organizationalUnitName    = test
            commonName                = www.test.com
        X509v3 extensions:
            X509v3 Subject Alternative Name:
                DNS:test.com, DNS:www.test.com, DNS:*.test.com
Certificate is to be certified until Mar 23 09:14:21 2035 GMT (3650 days)

Write out database with 1 new entries
Database updated
好了,以我为例,test_crypt.key是私钥,test_crypt.crt是证书。
5.CryptPad配置
后端配置成功后,访问主域名:
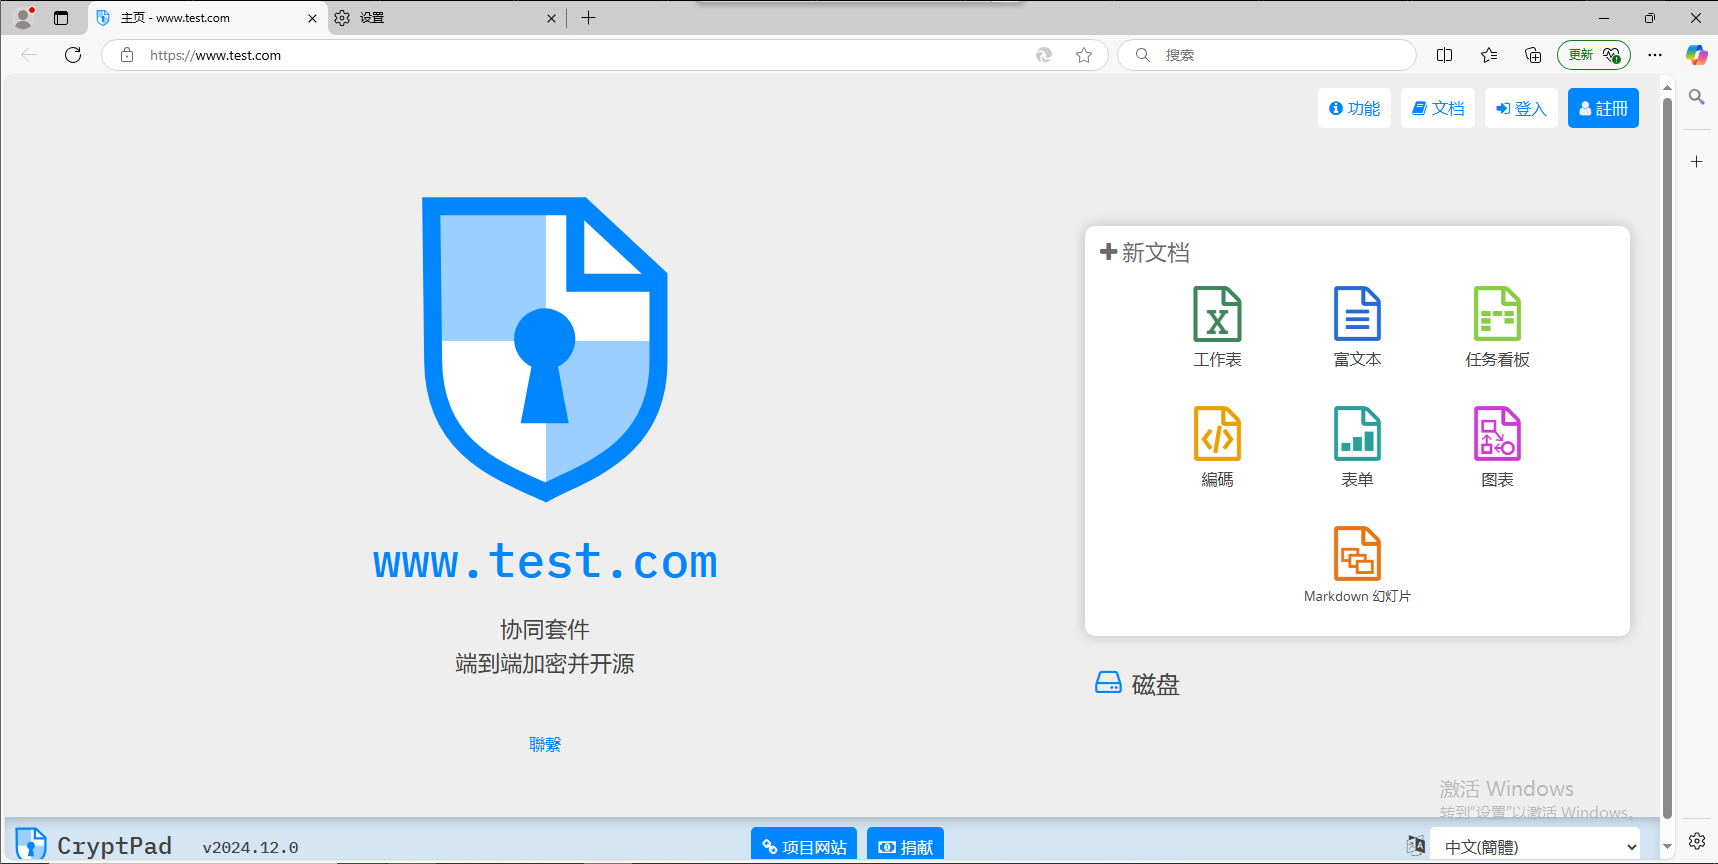
成功了,但是现在没有任何账号,还记得前面的配置URL吗?访问它。
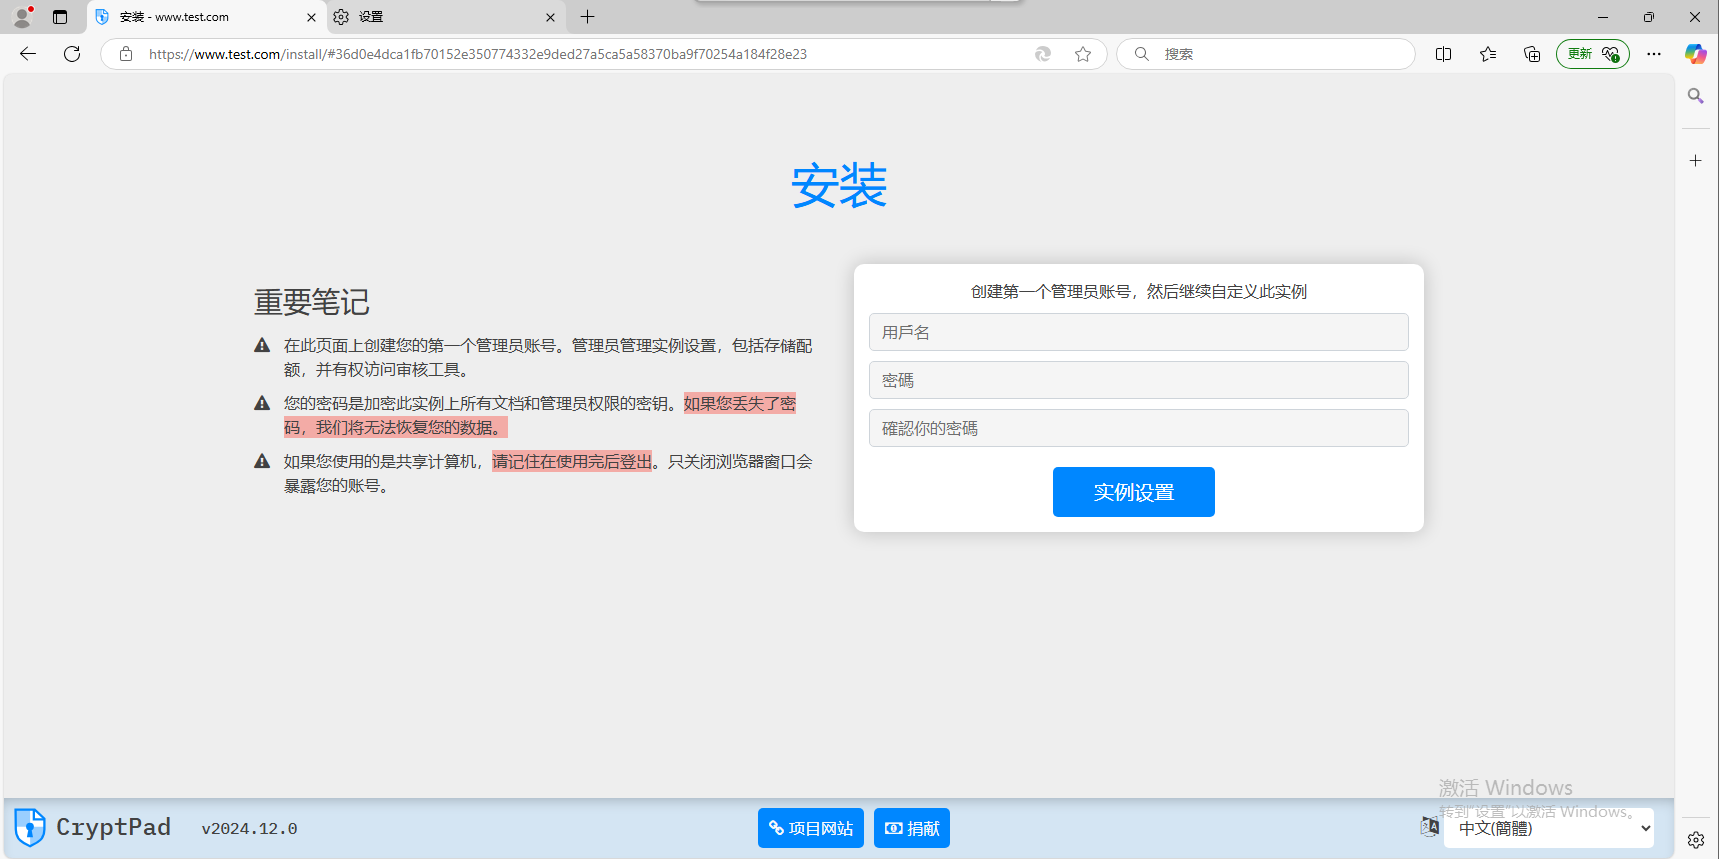
这里自行设置。
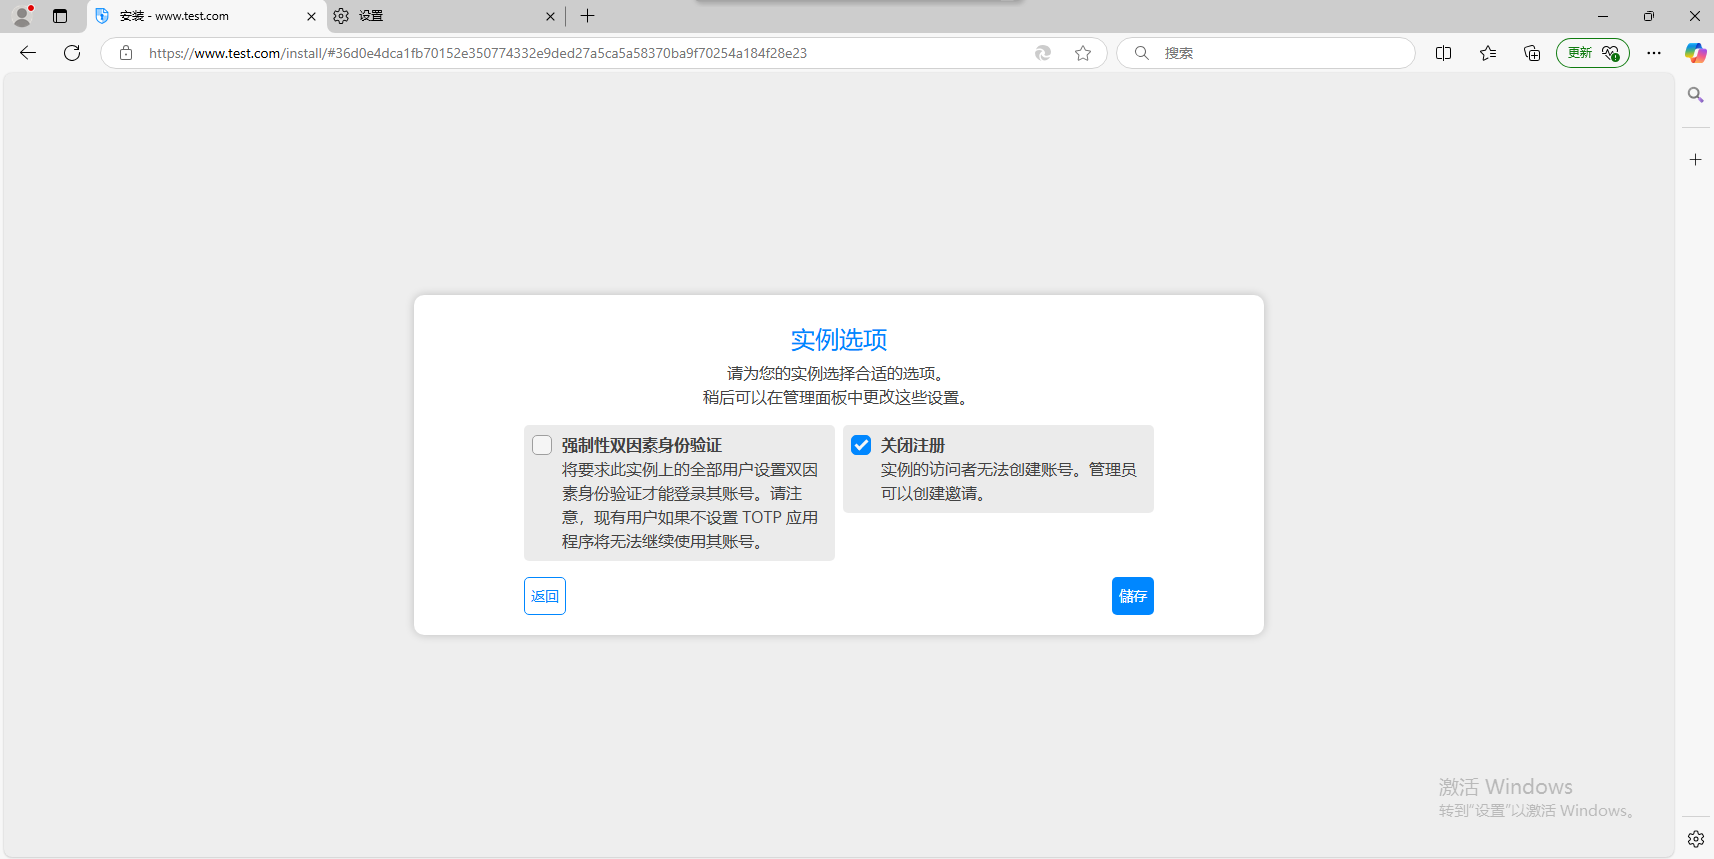
这个地方看个人,如果只有你用且目的是为了对外分享,可以选择关闭注册。
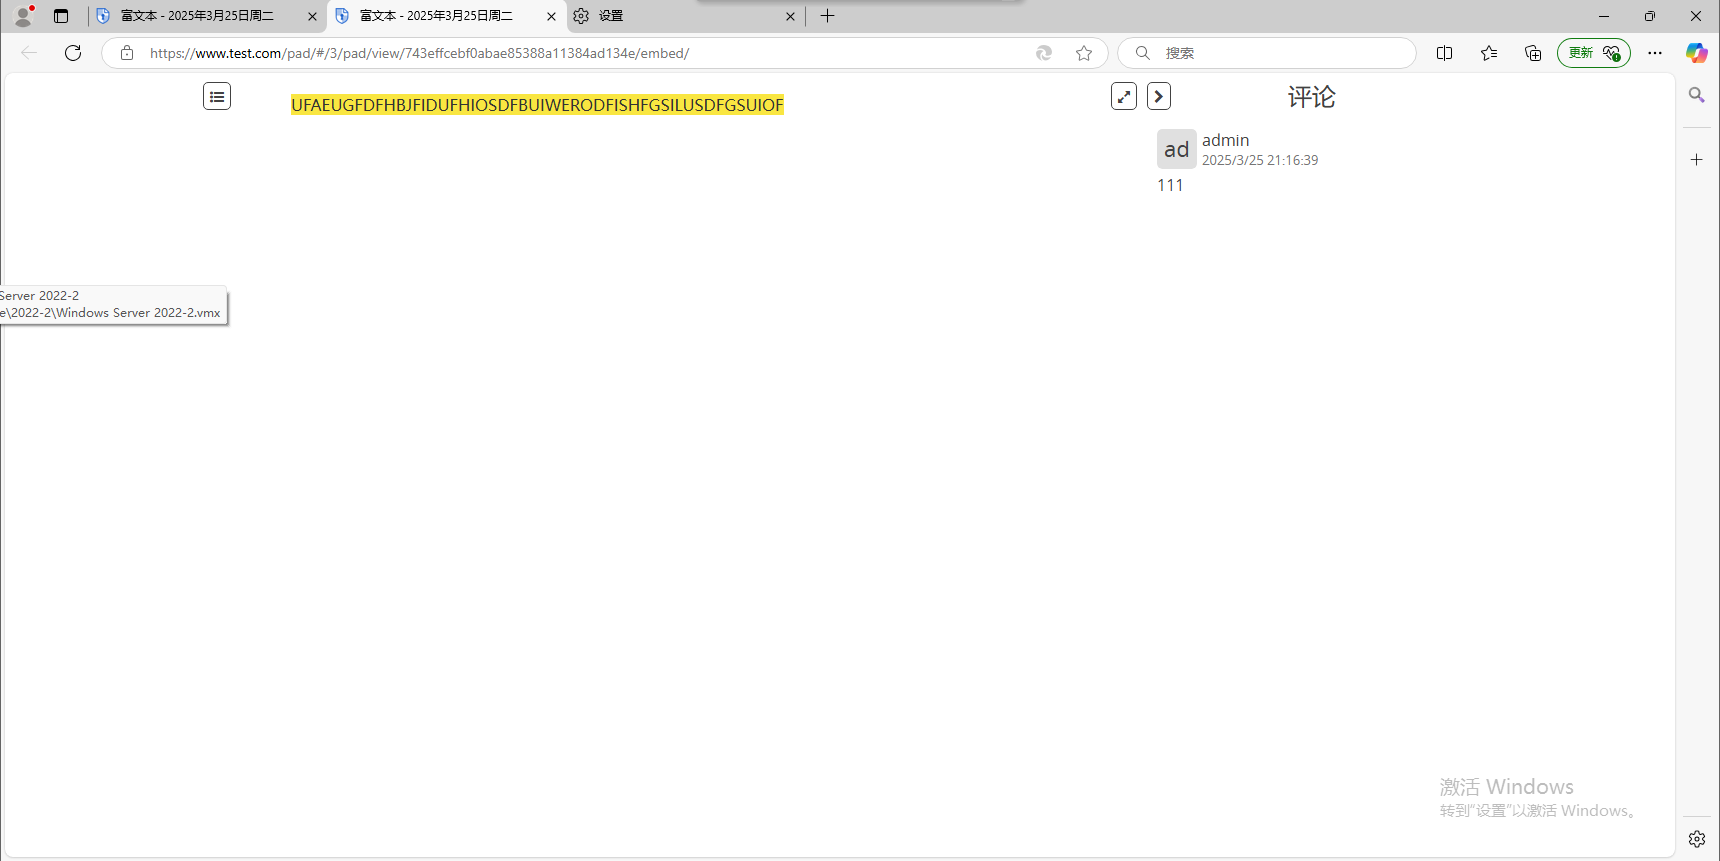
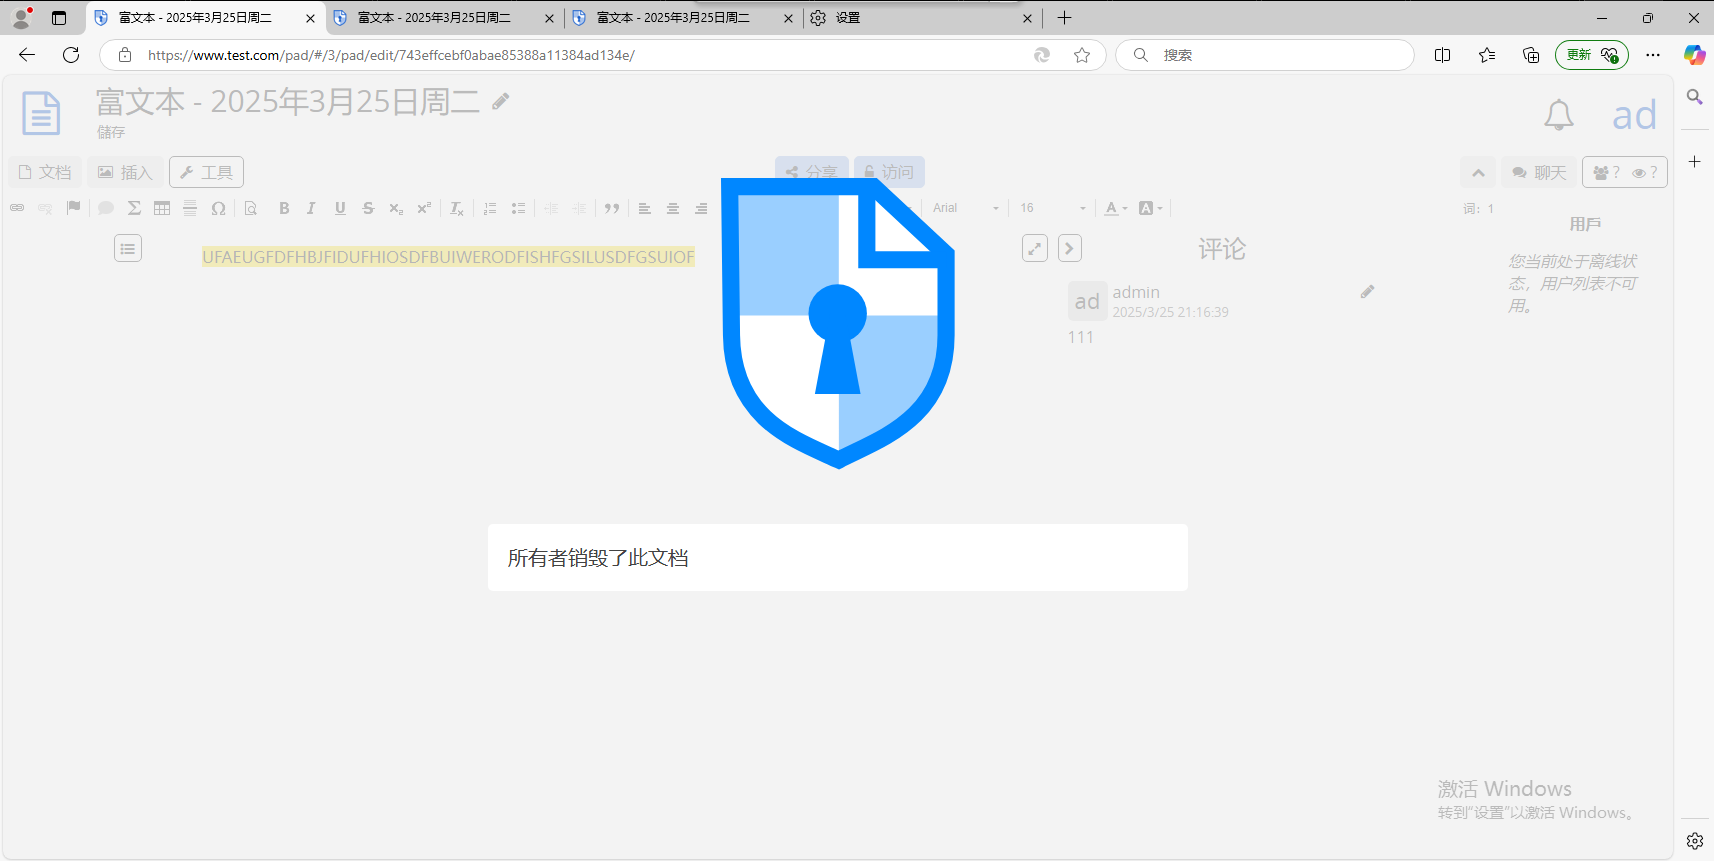
自毁之后连所有者都无法访问。
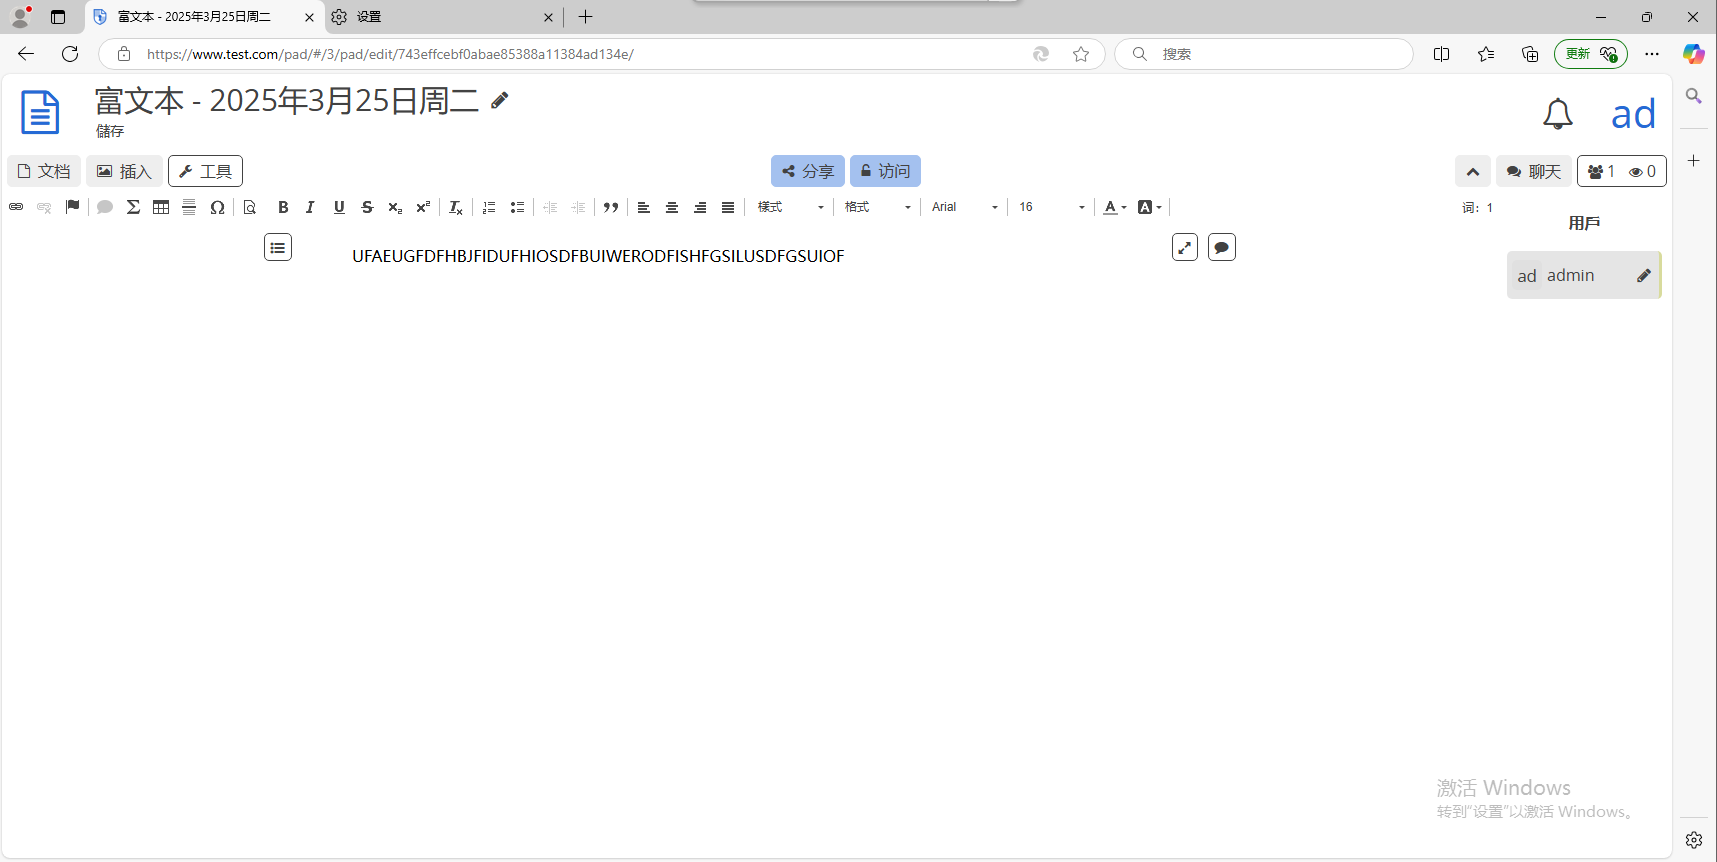
就先展示到这里,有什么功能你可以自己去看看。
6.一些说明
为什么不在docker里搭建?
事实上我也想,但是我的服务器用的是openresty,平常用面板管理。虽然也可以反向代理,但是控制台会出现CSP错误,这就导致cryptpad一直卡在界面加载过程。
然后我又懒得去动openresty了,不然到时候又把别的服务搞崩溃。所以建议直接用nginx,然后用上面的官方示例配置文件。
至于这个服务本身,它不能直接导入docx,所以如果要记录点东西,我推荐markdown存储。
7.参考文章
我也是看了别的文档,然后整合出这篇教程的。